
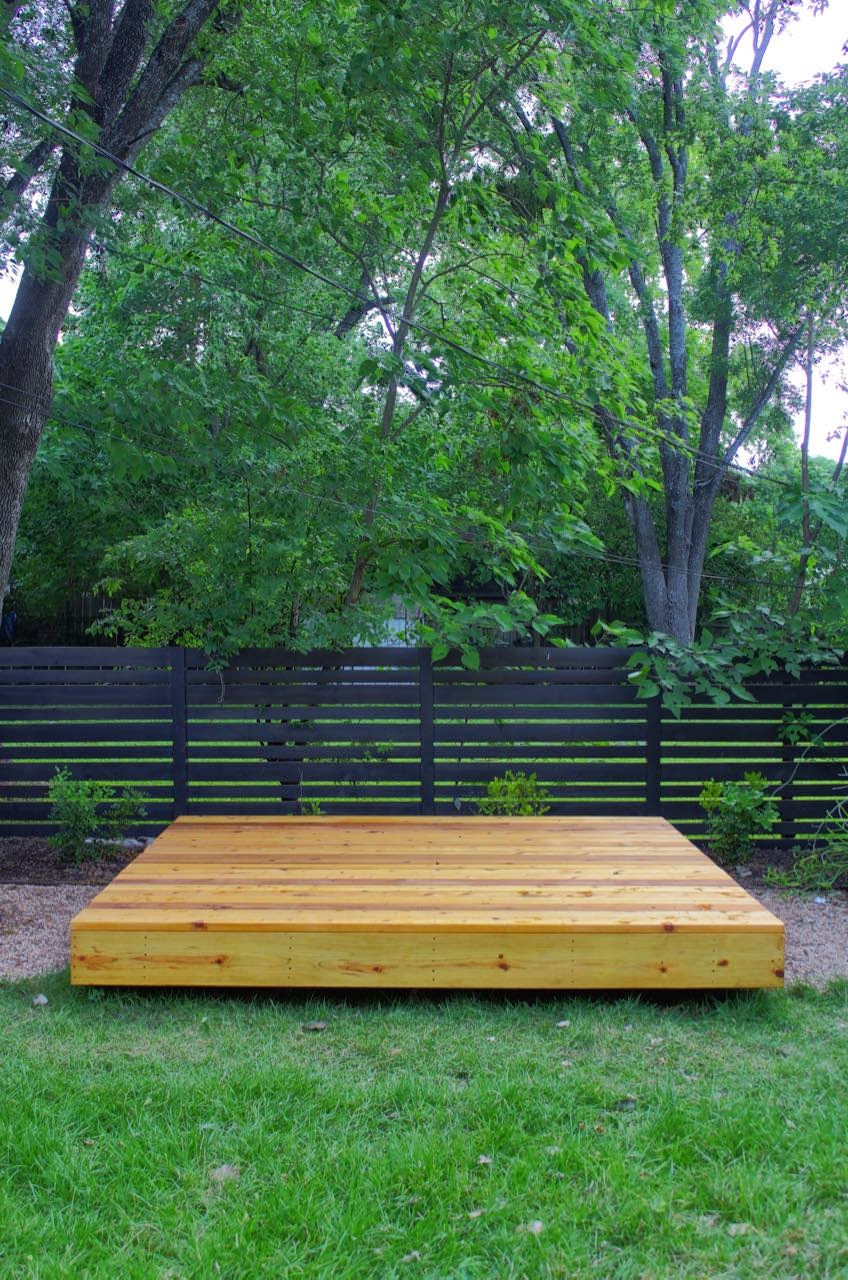
Whelp, it took some three weekends (not solid...) and a few hours on a few weekday nights to get 'er done, but there she is in all her glory. That baby has all that we wanted in a deck/stage: (1) "floating" [cantilevered out the sides such that you can't see the foundation], (2) sealed cedar decking, and (3) under-carriage LEDs. I want to face the sides with Hardy painted white, but the bride likes it the way it is, so we are leaving it the way it is for now...
If you recall, while flipping through a how-to manual at Lowe's, I saw the basic plan and thought to myself "Hell, I could do that!". And so I did, all by myself with no help (not bragging: just pointing out that this project can by done by a single relatively incompetent dude or dudette).
The design is rather brilliant. Would you believe that all I had to do was cut six boards? No joke. That only works if you want what is essentially a square deck (it's a wee bit wide by 3 inches in one direction) and that the standard length of lumber (in this case, 10 feet) will fit the bill.
For the deck proper, what you see cost $670 in materials. For the electrical stuff, add $210 for a total cost of $880.
Step one: Level out the deck footers. Because our base was made of pea gravel, this was a piece of cake. I first leveled the front footers and then leveled the back ones from the front.
.jpg)
Step 2: Lay out the pressure-treated support boards. The plans called for 6-inch boards, but I went with 10-inch since at that point I was planning on facing the edges with 12-inch Hardy (10-inch boards plus 2-inch decking = 12 inches).
.jpg)
Here's how the boards fit into the deck footers:
.jpg)
Grumpy old man interlude: Kids, I remember back in my day when these footers were of much higher quality where I didn't have to chisel out the concrete bits to make it all level. I also had to carry them both ways uphill in snow.
Step 3: Add the facing plates and then the side plates. This took a wee bit of doing being one dude, but bricks and boards allowed me to get the various bits at the right height.
Grumpy old man interlude: Back in my day, although 2" x 4" wasn't quite 2 inches by 4 inches, I could count on the width (10 inches) being consistent. It seems that these days that is not consistent. And I had to carry the damn things uphill both ways in snow.
.jpg)
Step 4: Add the side bracing. This is where I needed to make the six cuts. These side boards help support the cantilevered edges to the right and left of the photo above. A critical step here is measuring across the deck to make sure it's the same length throughout (them boards be bowed).

Here you can see all the side braces in place:

Step 5: Install the LED rope light. Make sure that LED rope light is outdoor safe like mine.

Step 6: Seal the decking boards as well as the sides of the frame. This took about a solid day to do since I did all six sides of each board. Note that this is the "clear" sealer. Not so clear, is it?

Here you can see the before sealed (right) and after sealed (left):


Step 7: Install the decking boards. I spaced them by using three good-sized nails that are about 1/8-inch in diameter. As it turned out, the boards fit the deck perfectly such that I didn't have to rip cut the last board.
Grumpy old man aside: Back in my days, besides clamshell phones, we had boards that were all the same length. Seems that the crazy kids these days cut em all in different lengths. And I had to carry my two spacing nails uphill both ways in snow storms.

Step 8: Enjoy! The LEDs make the deck appear to levitate like a UFO. They also provide a visual to keep folks from dinging their legs on the deck and/or falling off the sides (into the snow).

No comments:
Post a Comment